

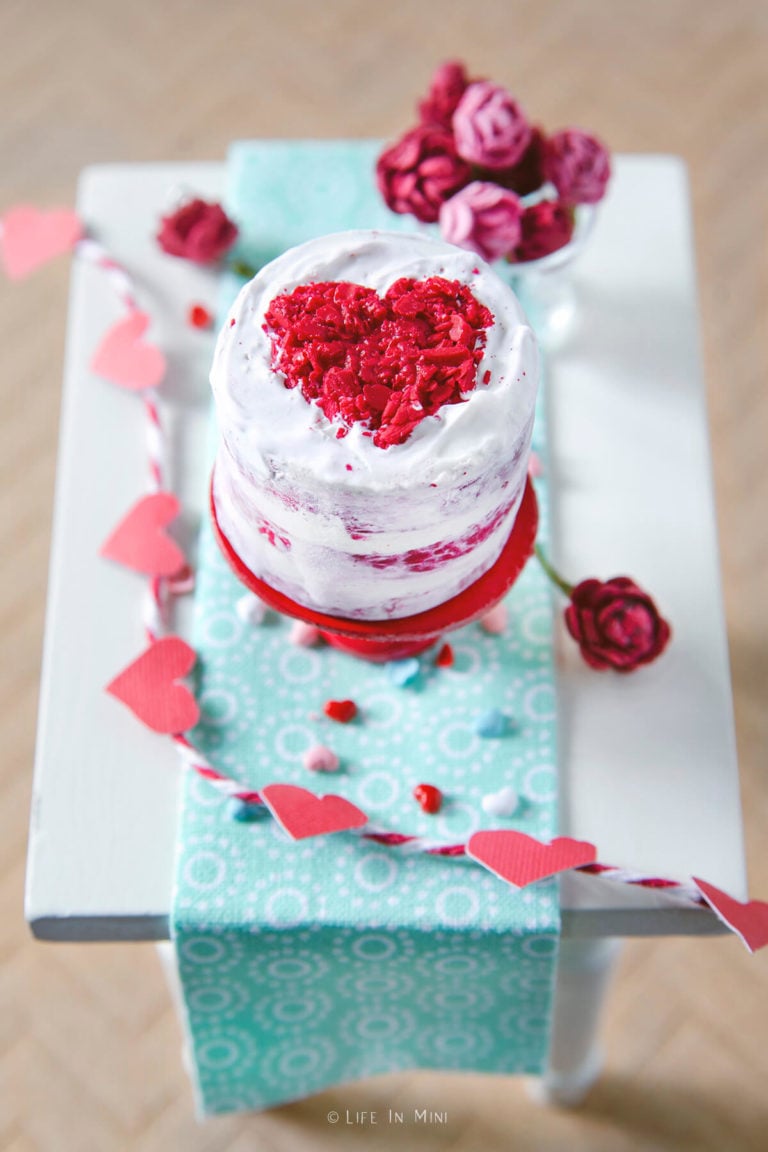
How To Make A Minature Red Velvet Cake Out Of Polymer Clay
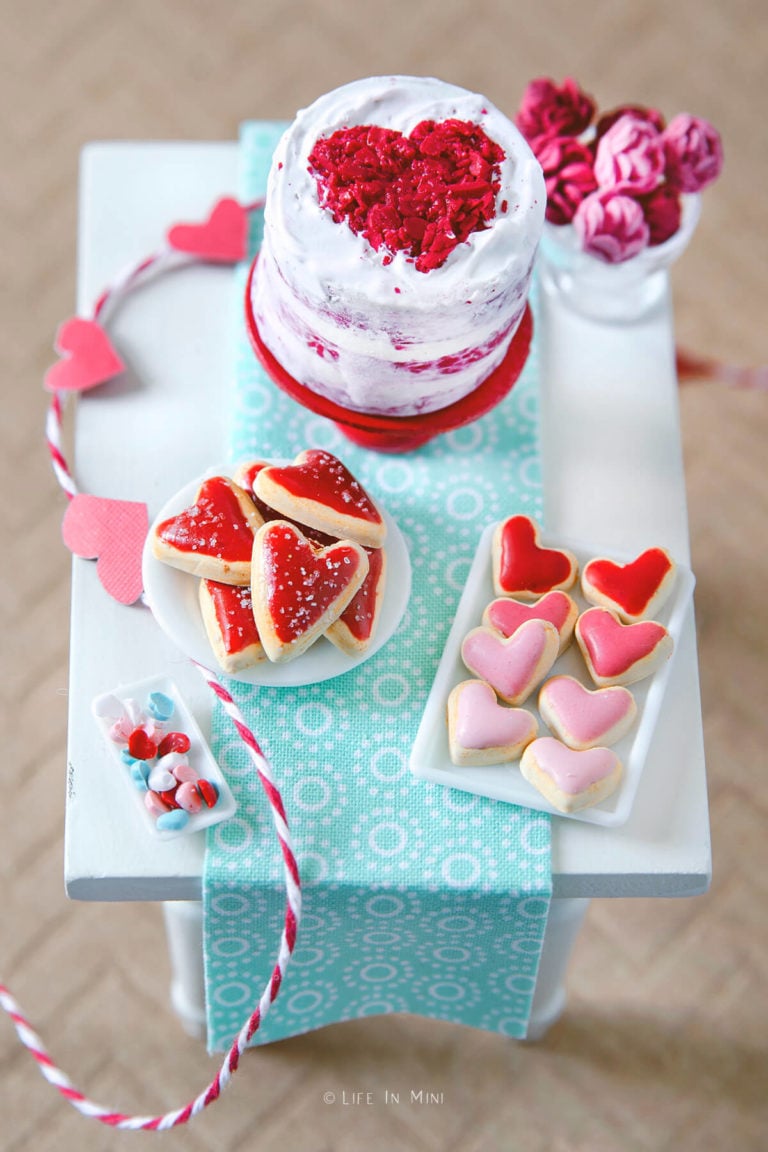
Mini food is fun to make using polymer clay. This miniature cake is meant to resemble a red velvet cake for Valentine's Day.
I find blistering to be very therapeutic. As well enjoying eating what I bake, there is something satisfying about creating cakes, breads and cookies from raw ingredients. And my family unit enjoys what I make, besides!
Since working more than with my minis, I equally enjoy making miniature food with polymer clay. At first I was very intimidated with all the artistic people creating astonishing and realistic mini foods.
My favorite foods to make out of polymer clay are cakes and desserts. Today'southward block is a cherry velvet center cake inspired from my friend Jenni's traditional scarlet velvet cake with ermine frosting.
This polymer clay tutorial will show you how to make a mini reddish velvet cake with minimal white frosting and cake crumbles to brand a eye on meridian.
This mail contains some chapter links for your convenience (which means if you brand a purchase later on clicking a link I will earn a pocket-sized commission but it won't price you a penny more than)! Read my total disclosure policy.
Supplies you lot demand
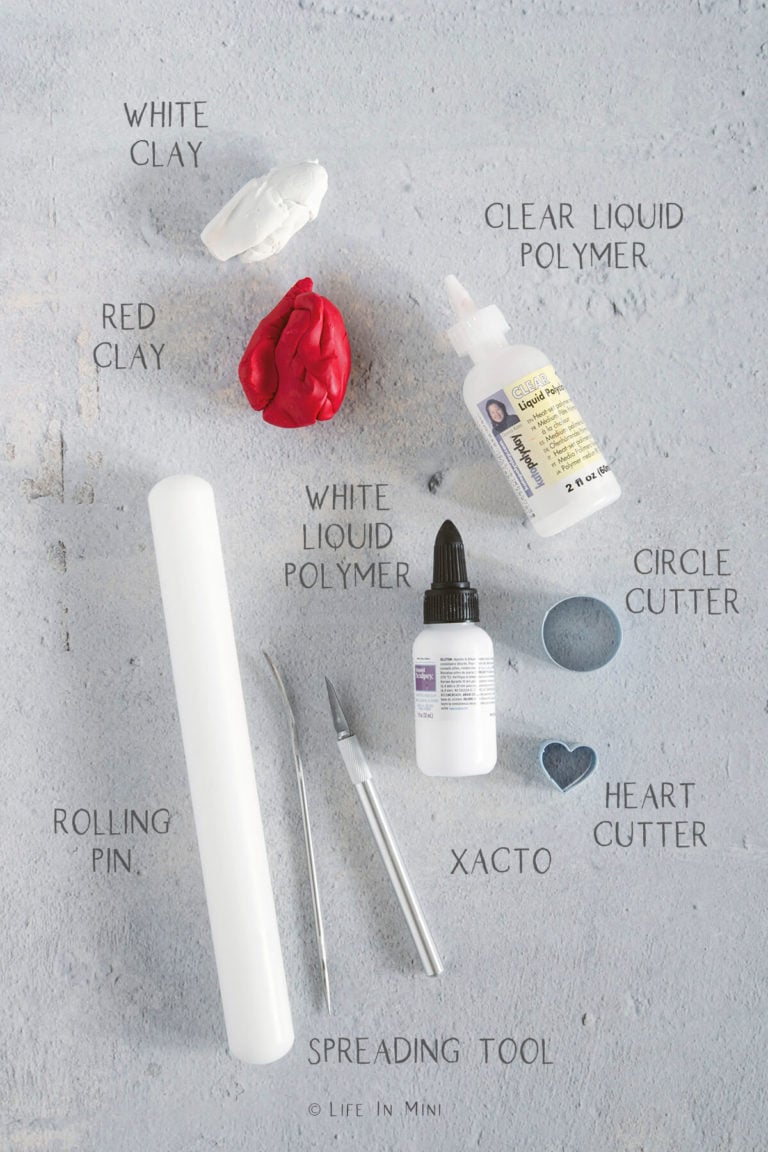
- Scarlet polymer clay: I chose to use regular red polymer clay. Experience costless to mix upward some magenta or purple to make it more beet red.
- White polymer clay: This is for the white frosting layers.
- White liquid polymer: This gives the naked cake frosted look. Y'all tin can besides mix in white clay or white pastel and mix it in with clear liquid polymer.
- Articulate liquid polymer: This helps attach the extra layer of crumbs needed.
- Rolling pin: This is needed to roll the clay flat for the cake layers
- Xacto knife: For texturing the cake and creating the cake crumbles you volition need a sharp bract.
- Pocket-size clay trowel: When I frost a existent cake, I use an offset spatula. A trowel or other pocket-sized flat tool helps smear the frosting onto our miniature cake.
- Parchment paper: You can bake on parchment newspaper, a ceramic tile or a piece of drinking glass.
- Round cutter: Small cutters similar to cookie cutters are used to cut the block layers. I used a ane-inch circle.
- Center cutter: You can shape the crumbs to form a heart with just a thin tip tool, simply a modest heart cutter volition make this MUCH easier.
Step-by-step directions
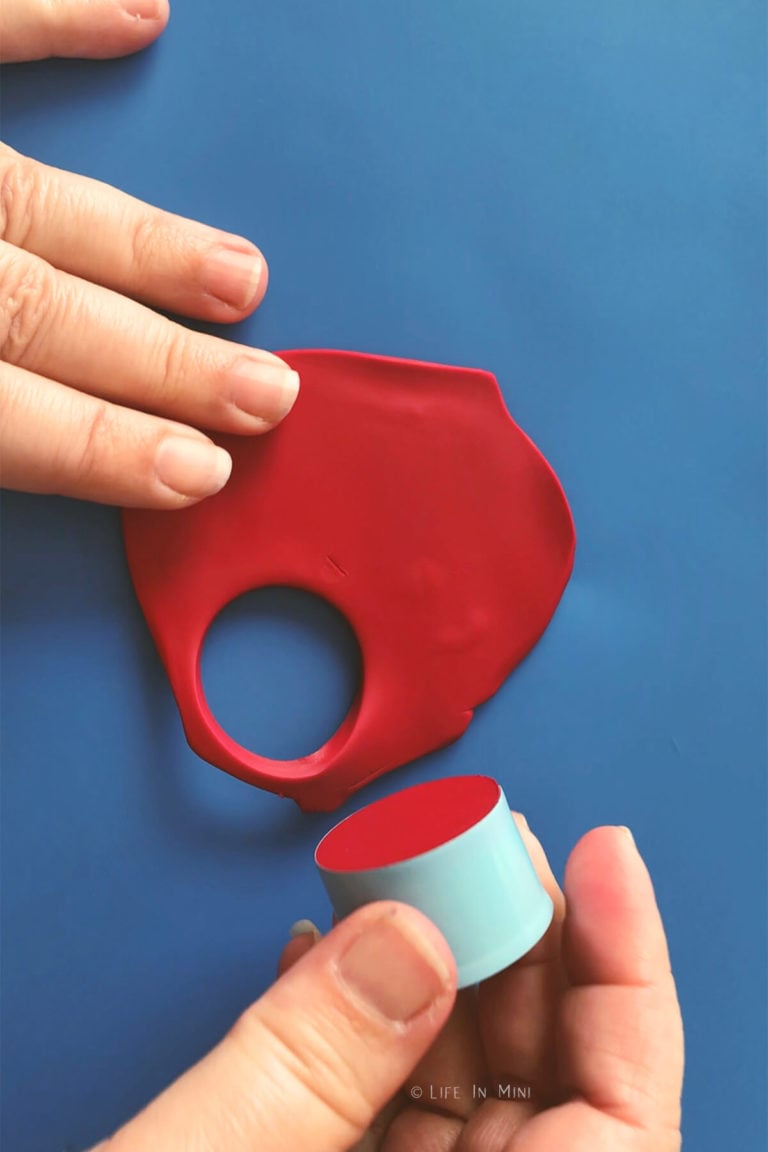
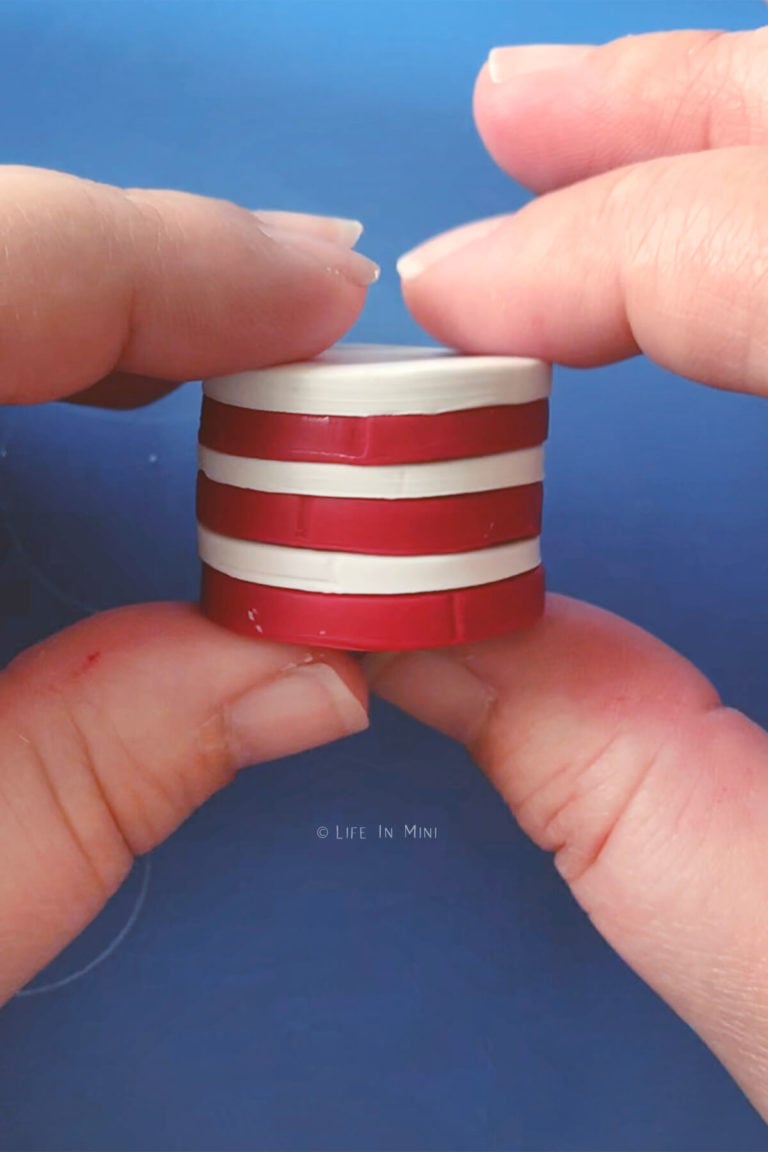
1. Soften red clay so coil information technology out until information technology is most ⅛-inch thick. Using a 1-inch circle cutter, cut out 3 reddish circles and set aside.
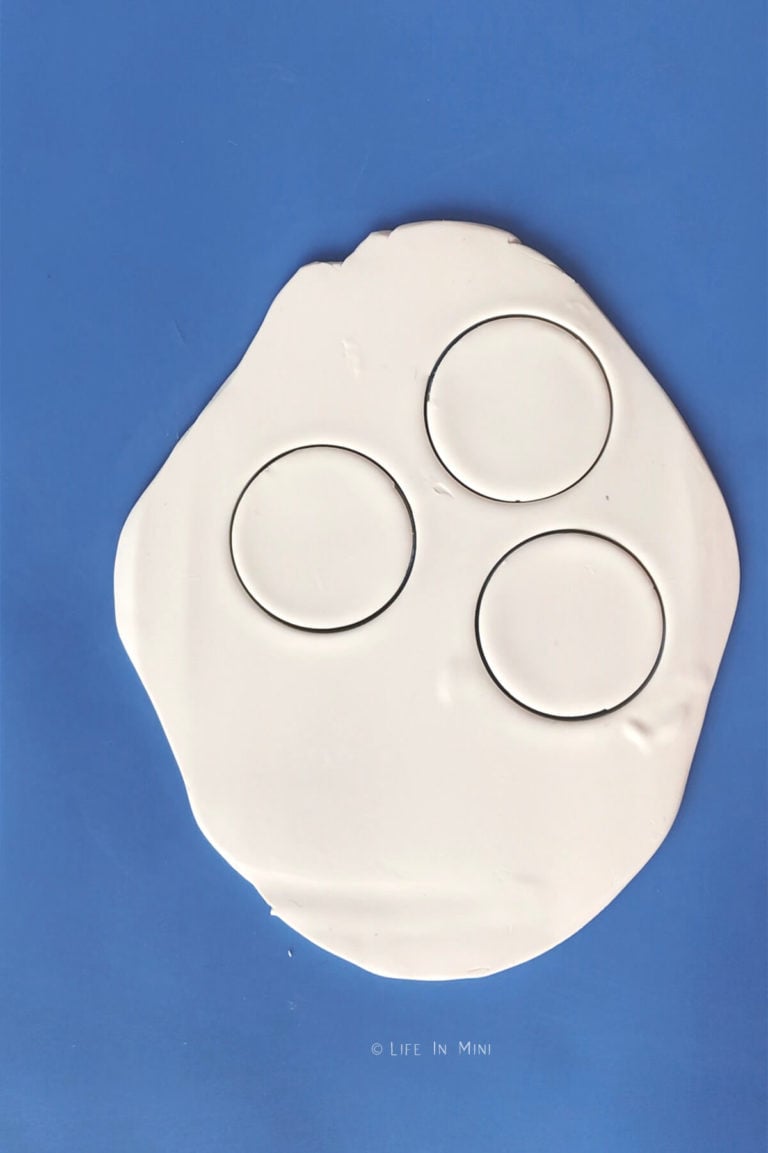
ii. Soften white clay then curl it out until it is about ⅛-inch thick or less. Using the same 1-inch circle cutter, cut out 3 white circles.
three. Starting with a red and catastrophe in white, start stacking the circles, alternating colors. One time the circles are stacked, gently whorl the stack on its side and tape the ends to keep the circles tightly packed together.
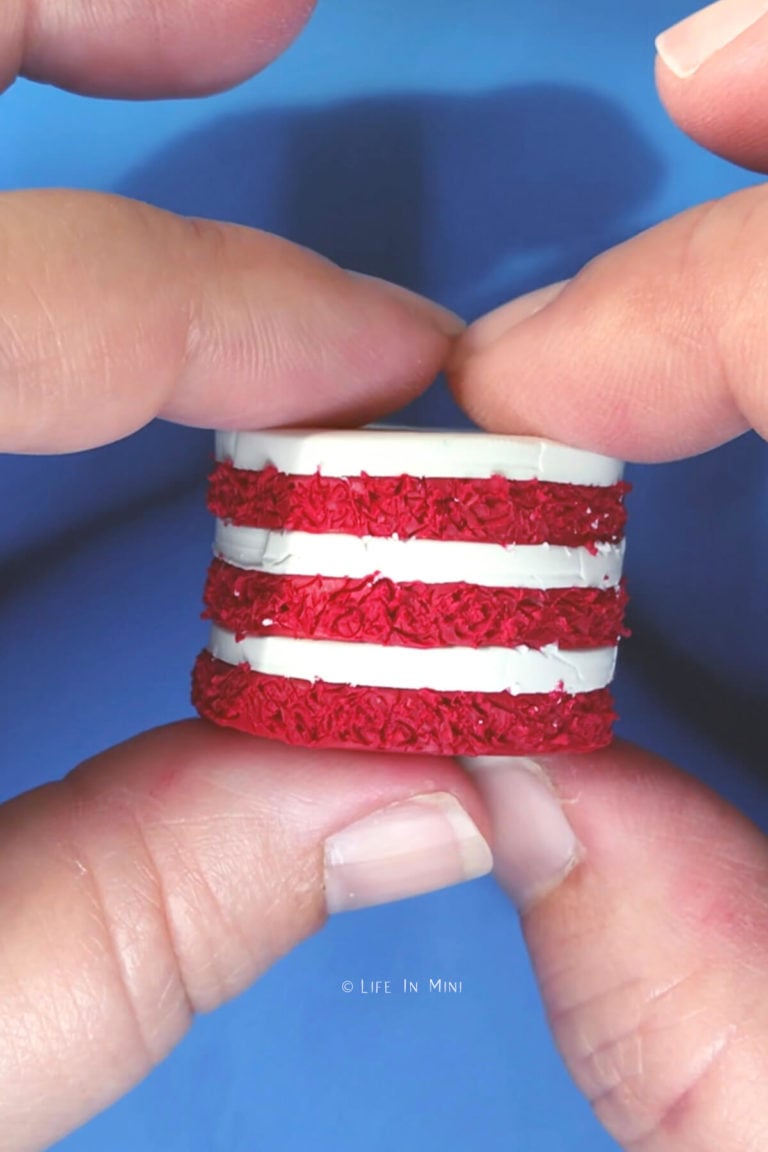
4. Using the Xacto pocketknife or a metal option, commencement texturing your cake layers. Brand small circles and jabs into the red layers just, all the way effectually the cake. Roll the cake a fiddling on its sides again.
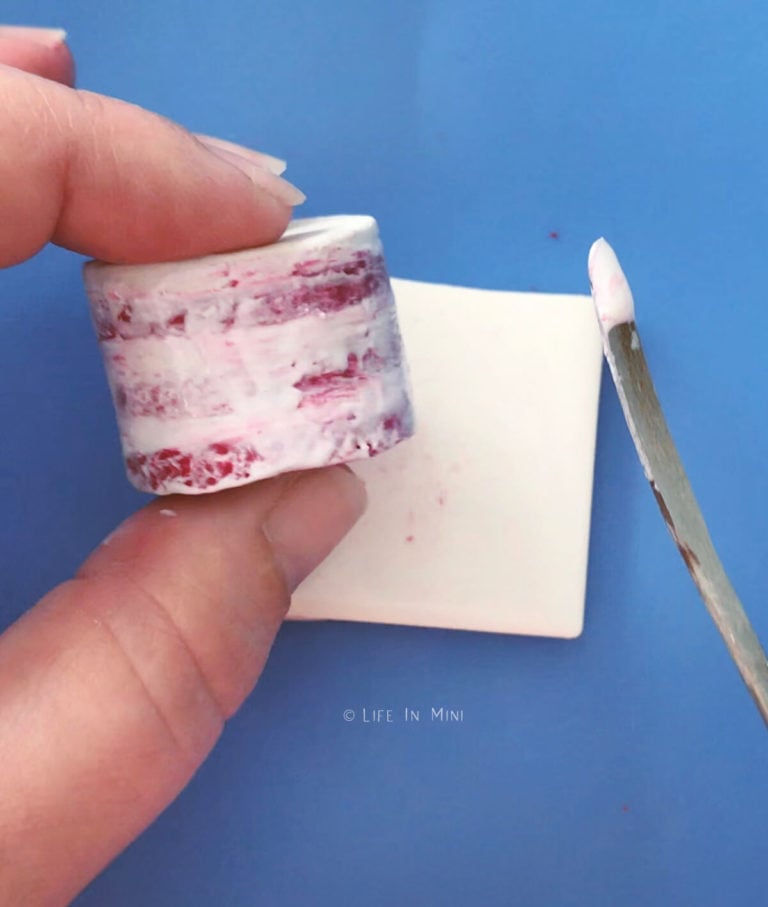
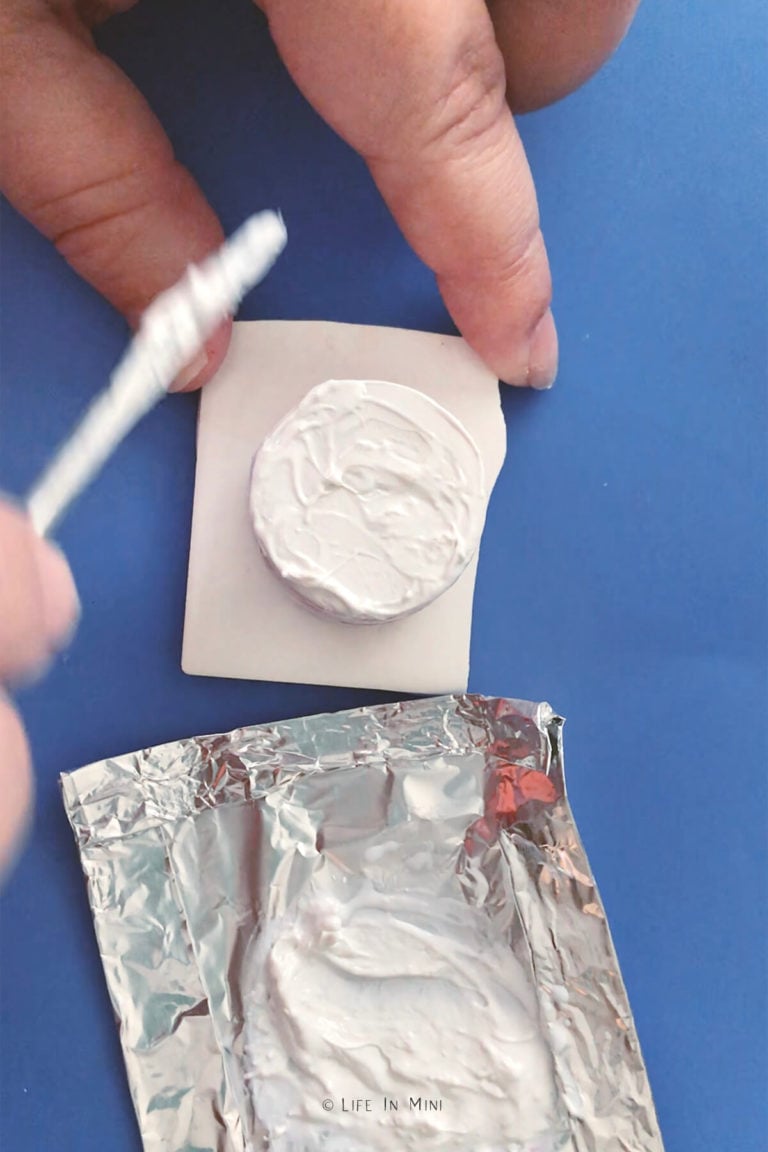
5. Clasp nearly ¼ teaspoon of white liquid polymer onto a piece of foil or parchment paper. Using a small flat trowel, spread the white liquid along the sides of the cake, roofing lightly both the cerise and white layers.
We are creating a naked block issue so it doesn't have to very thick. Brush off excess liquid polymer with a booze wipe. Place your cake onto a ceramic tile, piece of glass or parchment lined baking sheet. Bake at 170ºF for twenty minutes.
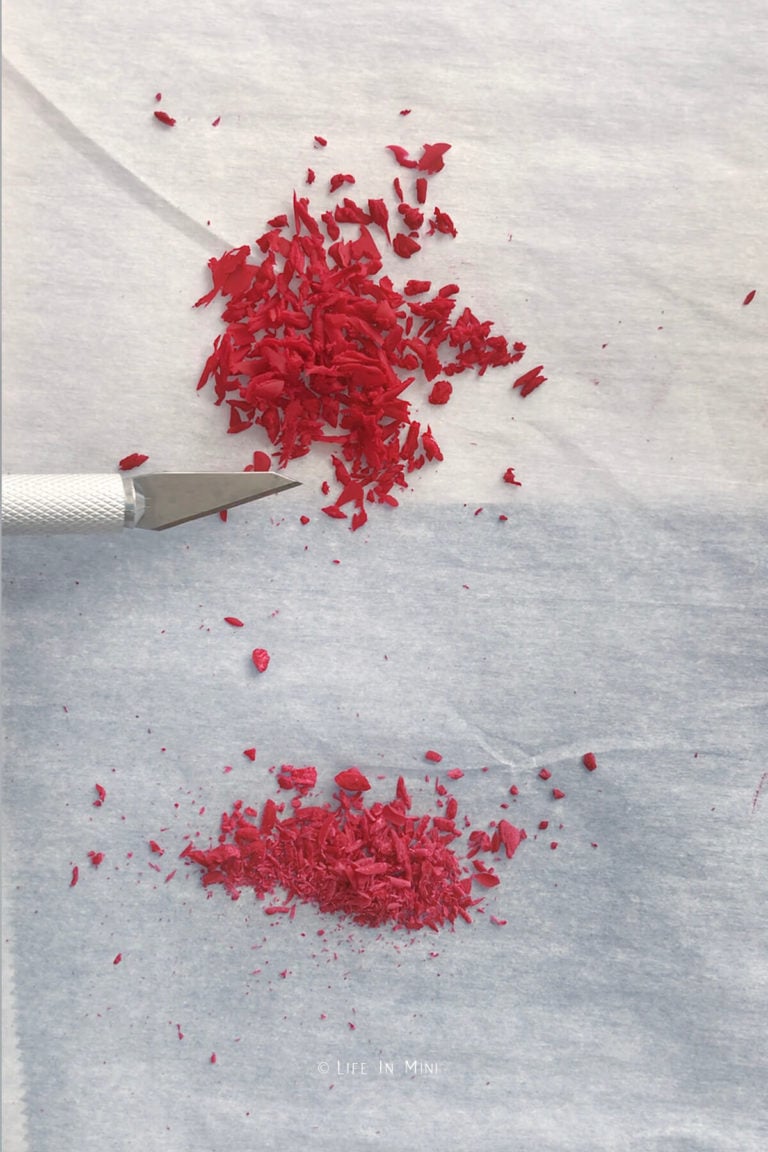
half dozen. There are 2 ways to create the red crumbs needed for the heart on peak of the cake. For large crumbs, place a modest tube of cerise clay in the freezer for twenty minutes. Shave off pocket-sized bits of ruby clay onto parchment paper and so broil for 10 minutes at 170ºF.
For smaller crumbs, whorl out a small ane inch roll of red clay and bake information technology for xx minutes at 170ºF. Once cooled, employ the Xacto to shave off bits of dirt.
7. When the cake has cooled, yous are gear up to finish the meridian. Spread virtually ¼-inch brawl worth of white clay on a piece of foil or parchment newspaper. Using a pocket-sized palate knife, mix in white liquid polymer or clear liquid polymer until you lot have the consistency of frosting.
Spread this frosting onto the meridian surface of your cake, the summit white layer. Exist sure to addd some to go over the sides slightly.
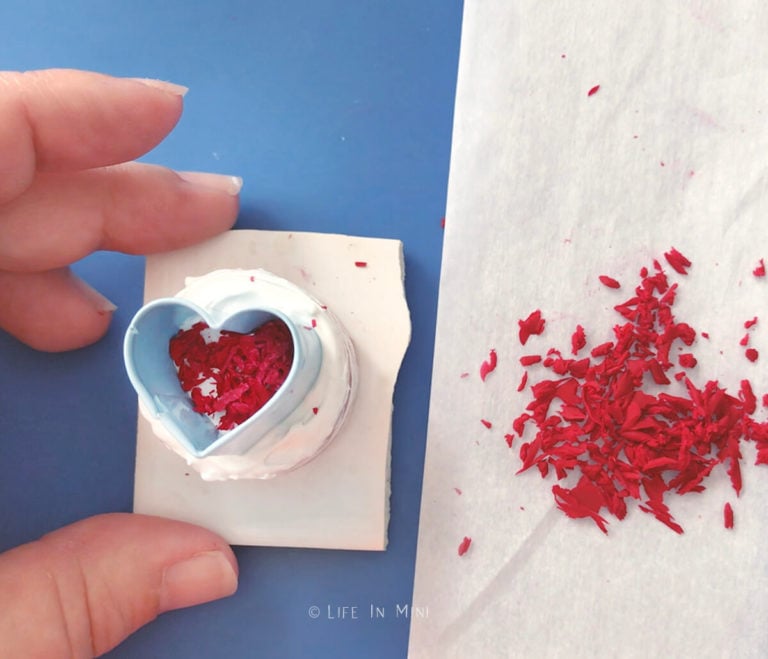
8. Place your heart cutter onto the heart of the meridian layer. Start dropping in the shaved $.25 of baked cherry-red clay into the heart cutter. Use the rounded end of your Xacto to printing the red bits firmly downward.
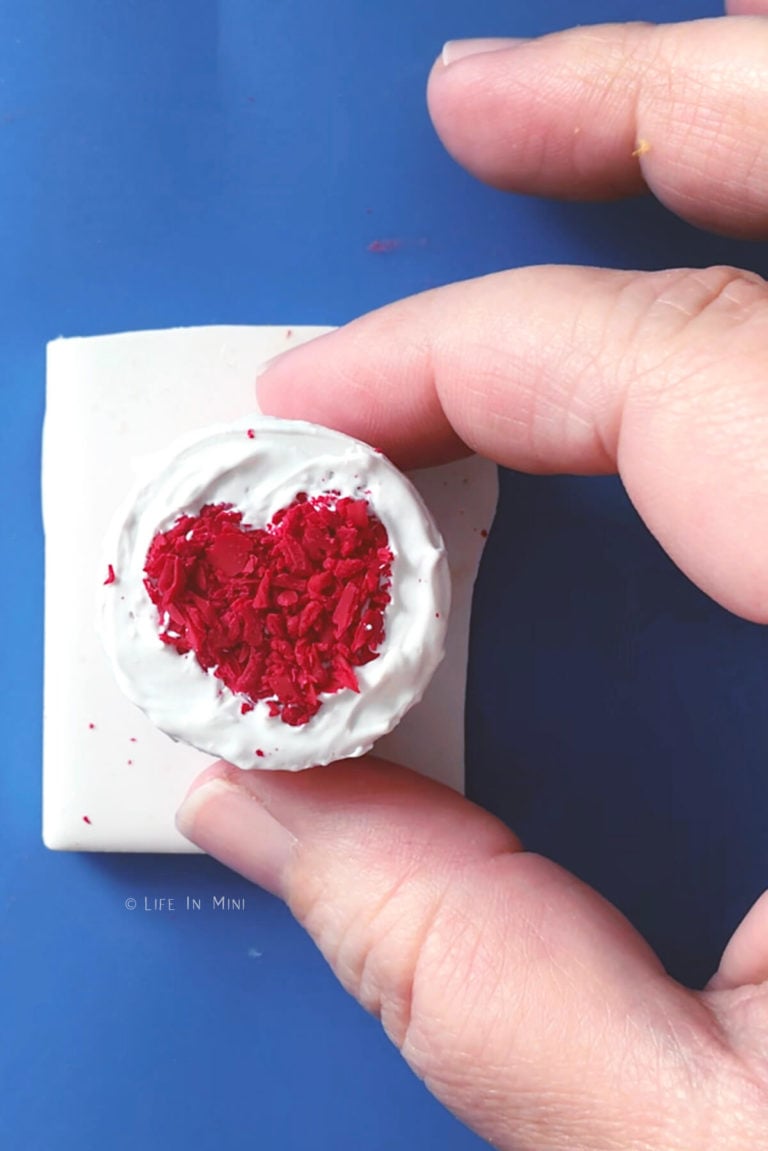
9. Gently remove the heart cutter and use the tip of your bract to clean up whatever $.25 that take been misplaced. Broil the cake at 170ºF for xv minutes.
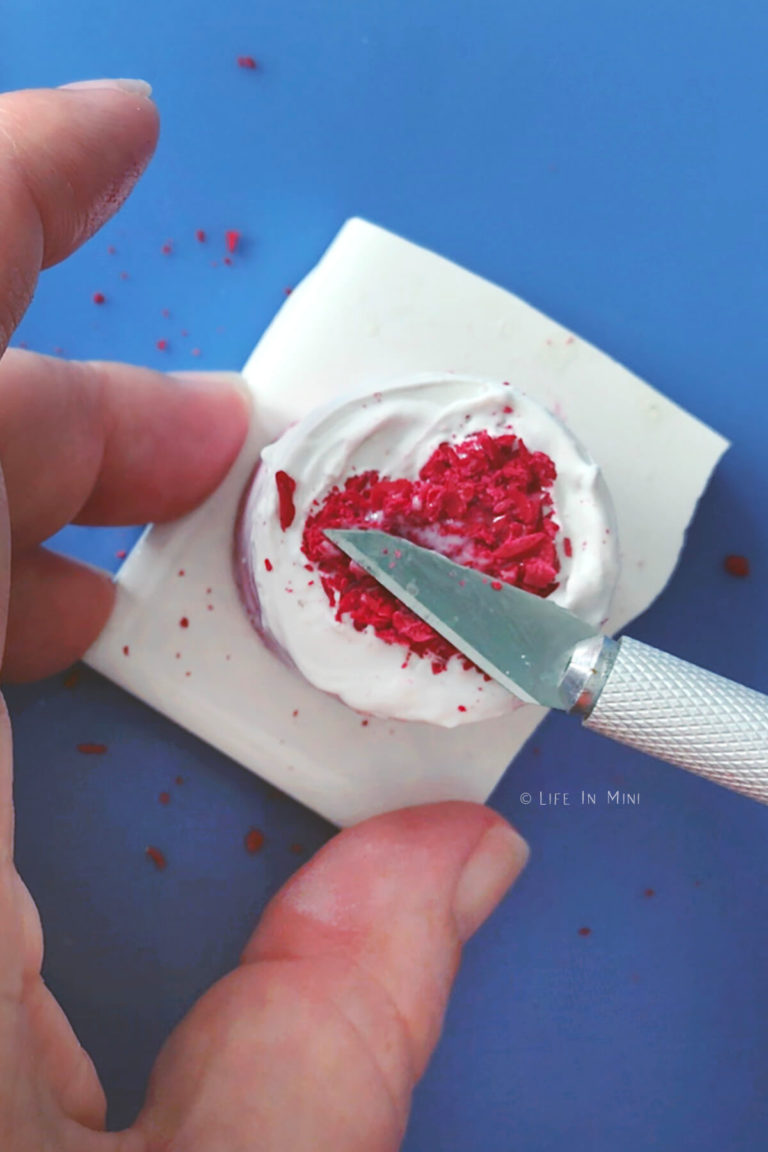
10. When the cake has cooled, shake off any loose red bits. If your red heart looks like it needs more crimson $.25, spread a thin layer of clear liquid polymer over the middle, place the middle cutter back on height of the cake and begin dropping cherry-red $.25 in.
Remove the cutter and press the bits into the clear liquid polymer. Bake again at 170ºF for ten minutes.
FAQs and project tips
I discover that baking the mini block in stages makes for treatment to block much easier. I utilize more often than not Sculpey clay, but I sometimes use other brands, ofttimes mixing them. Most dirt brands accept their directions on what temperature to bake your creations.
Baking at lower temperatures volition ensure that your work will not crack. Slowly heating and cooling your clay work will besides foreclose cracking.
-
Pigment Techniques for Dollhouse Roof
-
Where to Detect Dollhouse Supplies
-
Miniature Cotton wool Stems
-
Easy 1:12 Dollhouse Table
Prep Time v minutes
Active Time 30 minutes
Boosted Time 30 minutes
Total Time one hour 5 minutes
Difficulty Medium
Estimated Cost $10
Materials
- Red polymer clay
- White polymer clay
- White liquid polymer
- Clear liquid polymer
Tools
- Rolling pin
- Xacto pocketknife
- Small clay trowel knife
- Parchment paper
- Round cutter
- Heart cutter
Instructions
- Soften red dirt then ringlet it out until information technology is twenty thick.
- Using 1-inch circle cutter, cut out 3 red circles and set aside.
- Soften white clay then whorl information technology out until information technology is twenty thick.
- Using the same 1-inch circle cutter, cutting out three white circles.
- Starting with a ruby-red and catastrophe in white, start stacking the circles, alternate colors.
- One time the circles are stacked, gently roll the stack on its side and tape the ends to keep the circles tightly packed together.
- Using the Xacto pocketknife or a metal option, start texturing your block layers. Make small circles and jabs into the carmine layers only, all the way effectually the cake. Curl the block a little on its sides again.
- Squeeze nigh ¼ teaspoon of white liquid polymer onto a slice of foil or parchment paper. Using a modest flat palate knife, spread the white liquid along the sides of the cake, covering lightly both the cherry and white layers. We are creating a naked cake effect so information technology doesn't have to very thick. Brush off excess liquid polymer with a wet wipe.
- Place your block onto a ceramic tile, piece of glass or parchment lined baking sheet. Broil at 170ºF for xx minutes.
- There are two ways to create the red crumbs needed for the heart on top of the block. For large crumbs, place a small tube of ruby clay in the freezer for 20 minutes. Shave off small bits of ruby dirt onto parchment newspaper then bake for 10 minutes at 170ºF. For smaller crumbs, roll out a small 1 inch roll of cerise dirt and bake information technology for 20 minutes at 170ºF. Once cooled, use the Xacto to shave off bits of clay.
- When the cake has cooled, you are ready to finish the top. Spread virtually ¼-inch ball worth of white clay on a slice of foil or parchment newspaper. Using a small palate knife, mix in white liquid polymer or clear liquid polymer until you accept the consistency of frosting. Spread this frosting onto the top surface of your cake, the height white layer. Be sure to addd some to become over the sides slightly.
- Place your heart cutter onto the centre of the top layer. Get-go dropping in the shaved bits of baked red clay into the heart cutter. Apply the rounded terminate of your Xacto to press the cerise bits firmly down.
- Gently remove the centre cutter and use the tip of your blade to make clean up any bits that have been misplaced.
- Broil the cake at 170ºF for 15 minutes.
- When the cake has cooled, milk shake off any loose cerise $.25. If your cherry-red heart looks like information technology needs more blood-red bits, spread a thin layer of clear liquid polymer over the heart, place the middle cutter dorsum on top of the cake and begin dropping reddish bits in. Remove the cutter and printing the bits into the clear liquid polymer.
- Bake again at 170ºF for 10 minutes.
PS If you try this craft, why not leave a star rating in the direction menu correct below and/or a review in the comment section further downward the page? I ever appreciate your feedback.
You can as well follow me on Pinterest, Facebook or Instagram. Sign up for my eMail listing, likewise!
Source: https://lifeinmini.com/mini-food-red-velvet-miniature-cake/
Posted by: armstronghiserus1972.blogspot.com
0 Response to "How To Make A Minature Red Velvet Cake Out Of Polymer Clay"
Post a Comment